
So you got a new Raspberry Pi, and after some tinkering, like many others, you’ve decided you want to take the plunge into self hosting something. And why not? The Pi is a powerful computer and a very able small scale server with nearly endless use cases.
But if you are going to do this, you’re going to be exposing your Pi to the internet. And the internet can get very dangerous very fast with no protection (feel free to insert a dirty joke here). So we need to setup and harden the Pi just as we would any standard server deployed at the edge.
To do this you are going to have to harden your Raspberry Pi OS during setup and daily use. I recommend steps 1-4 are done first, Then install all software you want to host & configure it. Finally do steps 5-6. This will eliminate the firewall and fail2ban as potential setup problems.
There are several things we can do to mitigate the risks and harden our security. These are;
- Change the default password for the Pi user
- Change the Raspberry Pi default hostname
- Create a new user for regular use and maintenance
- Force Sudo to require a password
- Install a firewall (UFW)
- Install fail2ban to block repeated external attacks
A note as we start, everything we need to do is in bash. If you’ve used DOS before, this is the equivalent of the command prompt. In Rasbain it’s referred to as the “Terminal”. If you are looking at the desktop, you can find it here:
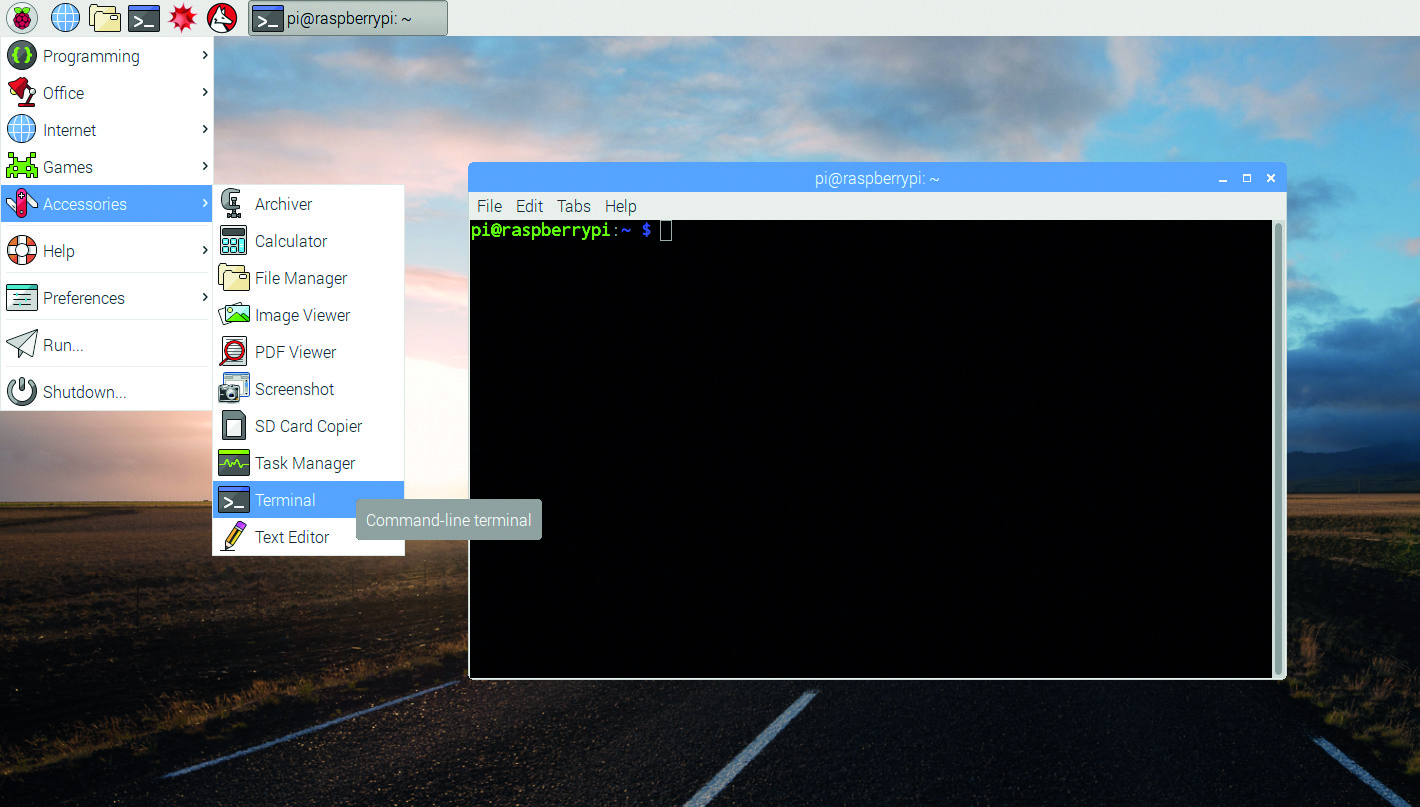
Otherwise you can find it by using SSH to connect to your PI. I recommend SSH due to it’s low overhead and that you should get accustomed to using a command line in general, but do whatever feels most comfortable for you.
Setup
The default OS on the Raspberry Pi is Raspberry Pi OS, a fork of Debain. If you’ve used Ubuntu before you’ve already used Debain. Raspberry Pi OS (formerly Rasbain) has broad community support and will receive regular updates for years to come. You will need to download the OS image to your computer and use an imaging software to write that to a memory card for first boot.
You can find excellent instructions on how to do this here: https://www.raspberrypi.org/documentation/installation/installing-images/README.md
I also recommend that enable SSH and VNC prior to first boot so you can do everything remotely instead of by plugging the Pi into a monitor with a keyboard and mouse. To enable VNC you will need to either use SSH or setup the Pi with a keyboard and monitor first.
Change the default password for the Pi user
Every Pi boots off a fresh install of the OS with the user “pi” enabled by default and a default password of “raspberry” (neither are capitalized).
Unfortunately, everyone in the world knows this so if you expose your Raspberry Pi to the internet without changing this, then everyone can log in as the administrator and change whatever they want. That’s because this default user has root privileges. So the first thing you are going to want to do is change this password. You can do this in the setup that runs when you first boot (herein referred to as raspi-config), but lets learn how to do this at the command line as that’s where most of Linux happens if you want to learn.
Type the following at the command line and hit enter;
passwd
Then type in any new password you want and hit enter. I very much recommend you choose a complex password you will remember.
Change the Raspberry Pi default hostname
The hostname is what the Raspberry Pi calls itself to all other devices on your network. It’s important to change this because a lot of bad faith actors will try and gain access to other portions of your network using the open ports and then look through the devices on the network for the Pi so they can try and exploit it. This works in part because the majority of people don’t change the Pi username / password. So they can find the device via it’s hostname, then easily log in.
Unlike most other commands here, this command is much easier when executed via the raspi-config setup system instead of manually via the command line. This is because doing this manually requires editing 3 different configuration files.
Let’s access the configuration setup software with the following command;
sudo raspi-config
Once the setup program loads, use the keyboard arrows to select item #2, “Network Options”. One the next screen select option N1 “Hostname”. You can now enter a new hostname with the letters A-Z (upper and lower), 1-9 and -. Hit enter when done and you will be brought back to the raspi-config main menu. Use tab to select Finish and press enter.

The Pi will now reboot. When it does, you can log into your router and see it listed by it’s new hostname in the list of connected devices. You can also check it worked by typing the following at the command prompt;
hostname
The command line will print out the host name you entered in raspi-config if everything was successful.
Create a new user for regular use and maintenance
Once you’ve changed the username of the “pi” user, you should retire that user and create a new one for yourself. The “pi” user should only be used for upgrades or major changes. Think of it like the “Administrator” user in Windows. You don’t log in as “Administrator” every morning, you log in as you.
You should create your own user because anyone that gains access to the login of the Pi from outside your network is unlikely to know your personal username and password unless they know additional personally identifying information about you. Together with the Pi user no longer having the default password, this will reduced a bad actors ability to successfully login by 90%.
To add a new user, type;
sudo adduser {usernameyouchoose}
You will then be prompted to add a password for the new user and then hit enter.
The new user will have a home directory of /home/{usernameyouchoose}/.
Likewise, the pi user had a home directory of /home/pi/
Now lets take it one step farther and give your new user Sudo privileges with the correct password when prompted. In other words, you can use sudo while logged in as your user the same way you can right click in windows and select “Run as Administrator”.
Type the following;
sudo usermod -a -G adm,dialout,cdrom,sudo,audio,video,plugdev,games,users,input,netdev,gpio,i2c,spi {usernameyouchoose}
You can then check that this worked by typing the following;
sudo su - {usernameyouchoose}
If that command runs without error, then this worked and your new daily user account has sudo privileges.
Force Sudo to require a password
In Linux using sudo in front of any command is the equivalent of right clicking a program and selecting “Run as Administrator”. Anything you type will be done without question, even if it damages the system, erases required files, etc.
You should require sudo ask for a password before it does anything that could damage the system. To do this you can either edit the file /etc/sudoers or use a command to add the line we want without having to open and possibly mistype something in this very important files.
To do that type the following;
echo "{usernameyouchoose} ALL=(ALL) PASSWD: ALL" >> /etc/sudoers
Install a firewall (UFW)
**Note, I wrote a long complicated description for this, then realized The Raspberry Pi Foundation already has such a a clear description that they should get the credit for this. Below is completely ©Raspberry Pi Foundation**
There are many firewall solutions available for Linux. Most use the underlying iptables project to provide packet filtering. This project sits over the Linux netfiltering system. iptables is installed by default on Raspberry Pi OS, but is not set up. Setting it up can be a complicated task, and one project that provides a simpler interface than iptables is ufw, which stands for ‘Uncomplicated Fire Wall’. This is the default firewall tool in Ubuntu, and can be easily installed on your Raspberry Pi:
sudo apt install ufw
ufw is a fairly straightforward command line tool, although there are some GUIs available for it. This document will describe a few of the basic command line options. Note that ufw needs to be run with superuser privileges, so all commands are preceded with sudo. It is also possible to use the option --dry-run any ufw commands, which indicates the results of the command without actually making any changes.
To enable the firewall, which will also ensure it starts up on boot, use:
sudo ufw enable
To disable the firewall, and disable start up on boot, use:
sudo ufw disable
Allow a particular port to have access (we have used port 22 in our example):
sudo ufw allow 22
Denying access on a port is also very simple (again, we have used port 22 as an example):
sudo ufw deny 22
You can also specify which service you are allowing or denying on a port. In this example, we are denying tcp on port 22:
sudo ufw deny 22/tcp
You can specify the service even if you do not know which port it uses. This example allows the ssh service access through the firewall:
sudo ufw allow ssh
The status command lists all current settings for the firewall:
sudo ufw status
The rules can be quite complicated, allowing specific IP addresses to be blocked, specifying in which direction traffic is allowed, or limiting the number of attempts to connect, for example to help defeat a Denial of Service (DoS) attack. You can also specify the device rules are to be applied to (e.g. eth0, wlan0). Please refer to the ufw man page (man ufw) for full details, but here are some examples of more sophisticated commands.
Limit login attempts on ssh port using tcp: this denies connection if an IP address has attempted to connect six or more times in the last 30 seconds:
sudo ufw limit ssh/tcp
Deny access to port 30 from IP address 192.168.2.1
sudo ufw deny from 192.168.2.1 port 30
For the majority of people that will be exposing their pi to the internet, you will need to open the following ports;
- Port 22 – for SSH access. You should use the limit command to limit the amount of times someone can try and log in via SSH by giving them a forced timeout.
- Port 80 – Standard HTTP:// port for insecure web page access
- Port 443 – Standard HTTPS:// port for secure web page access
Now lets reboot the Pi with the following command for this to take effect;
sudo shutdown -r -t 0
Install fail2ban to block repeated external attacks
fail2ban is a program utilized to block repeated bad actor attempts to access or login to your Pi by blocking and banning the source IP address’s from the internet. This helps to reduce DDOS attacks and limits the amount of times someone can try and login before they cannot reach your server to try again.
Fail2ban is well configured already, and can be utilized as-is for the purpose of this tutorial. To install it type;
sudo apt-get install fail2ban
fail2ban can be very complicated (or very easy). I recommend a little lite reading on the topic over a cup of morning coffee to ascertain what customization’s you may want to add.
Fin!
That’s it. This should cover you on the basics out of the box. You should now be secure for 90% of the situations you will encounter. Fine tune your UFW and fail2ban setting once you have all services you will be hosting installed by researching further what is applicable to you. I recommend googling both terms and the name of anything you are hosting to see what others recommend specific to those use cases.